Hi Stamping Friends,
I’m off to Secaucus NJ today to go to the Onstage Local event. I’m one of the presenters and I’m so excited to share a brand new product suite with the attendees. I’ll post the samples as soon as I can.
Over the next few days I’ll share some samples of super cute cards.
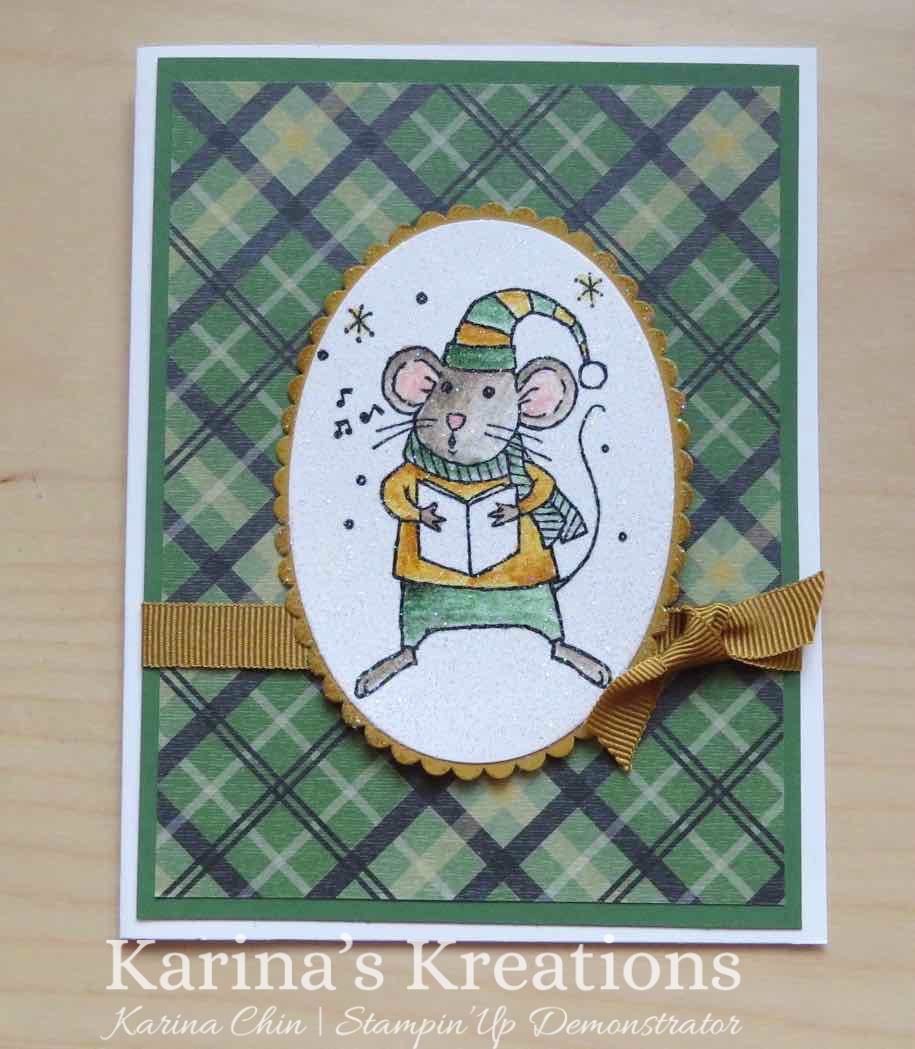
Today is a card using the Merry Mice stamp set #142145 which is on sale for $25% off.
Anyone placing a minimum $60.00 order this month will get instructions to make 3 Merry Mice cards at home.
Here’s the instructions for this cute card.
Supplies: Merry
Mice stamp set, Oval Layering Framelits, Warmth and Cheer
Mice stamp set, Oval Layering Framelits, Warmth and Cheer
Designer Series Paper Stack, 3/8” Ribbon Trio Pack, Blender
Pen, Dazzling Diamonds Glitter, Clear Embossing Powder
Pen, Dazzling Diamonds Glitter, Clear Embossing Powder
Directions
1.
Fold 5-1/2” x 8-1/2” Whisper White card stock in half to make a card
base.
Fold 5-1/2” x 8-1/2” Whisper White card stock in half to make a card
base.
2.
Attach 3-3/4” x 5” Warmth & Cheer designer paper to 4” x 5-1/4”
Garden Green card stock. Add tear tape to the back of the Garden Green card
stock and attach 5” of Delightful Dijon Ribbon to the card stock. Slide 4”
piece of Delightful Dijon ribbon under the ribbon and tie. Attach to the card
base.
Attach 3-3/4” x 5” Warmth & Cheer designer paper to 4” x 5-1/4”
Garden Green card stock. Add tear tape to the back of the Garden Green card
stock and attach 5” of Delightful Dijon Ribbon to the card stock. Slide 4”
piece of Delightful Dijon ribbon under the ribbon and tie. Attach to the card
base.
3.
Stamp the mouse image with Black Archival ink on 3” x 4” Whisper White
card stock. Cut out using an oval framelit.
Stamp the mouse image with Black Archival ink on 3” x 4” Whisper White
card stock. Cut out using an oval framelit.
4.
Squeeze Garden Green, Delightful Dijon, Crumb Cake and Pink Pirouette
ink pads. Open the lids and color using a blender pen and the ink on the stamp
pad lids.
Squeeze Garden Green, Delightful Dijon, Crumb Cake and Pink Pirouette
ink pads. Open the lids and color using a blender pen and the ink on the stamp
pad lids.
5.
Cut a scallop oval from 3” x 4” Delightful Dijon card stock using a
scalloped oval framelit. Attach the mouse image to the scallop oval.
Cut a scallop oval from 3” x 4” Delightful Dijon card stock using a
scalloped oval framelit. Attach the mouse image to the scallop oval.
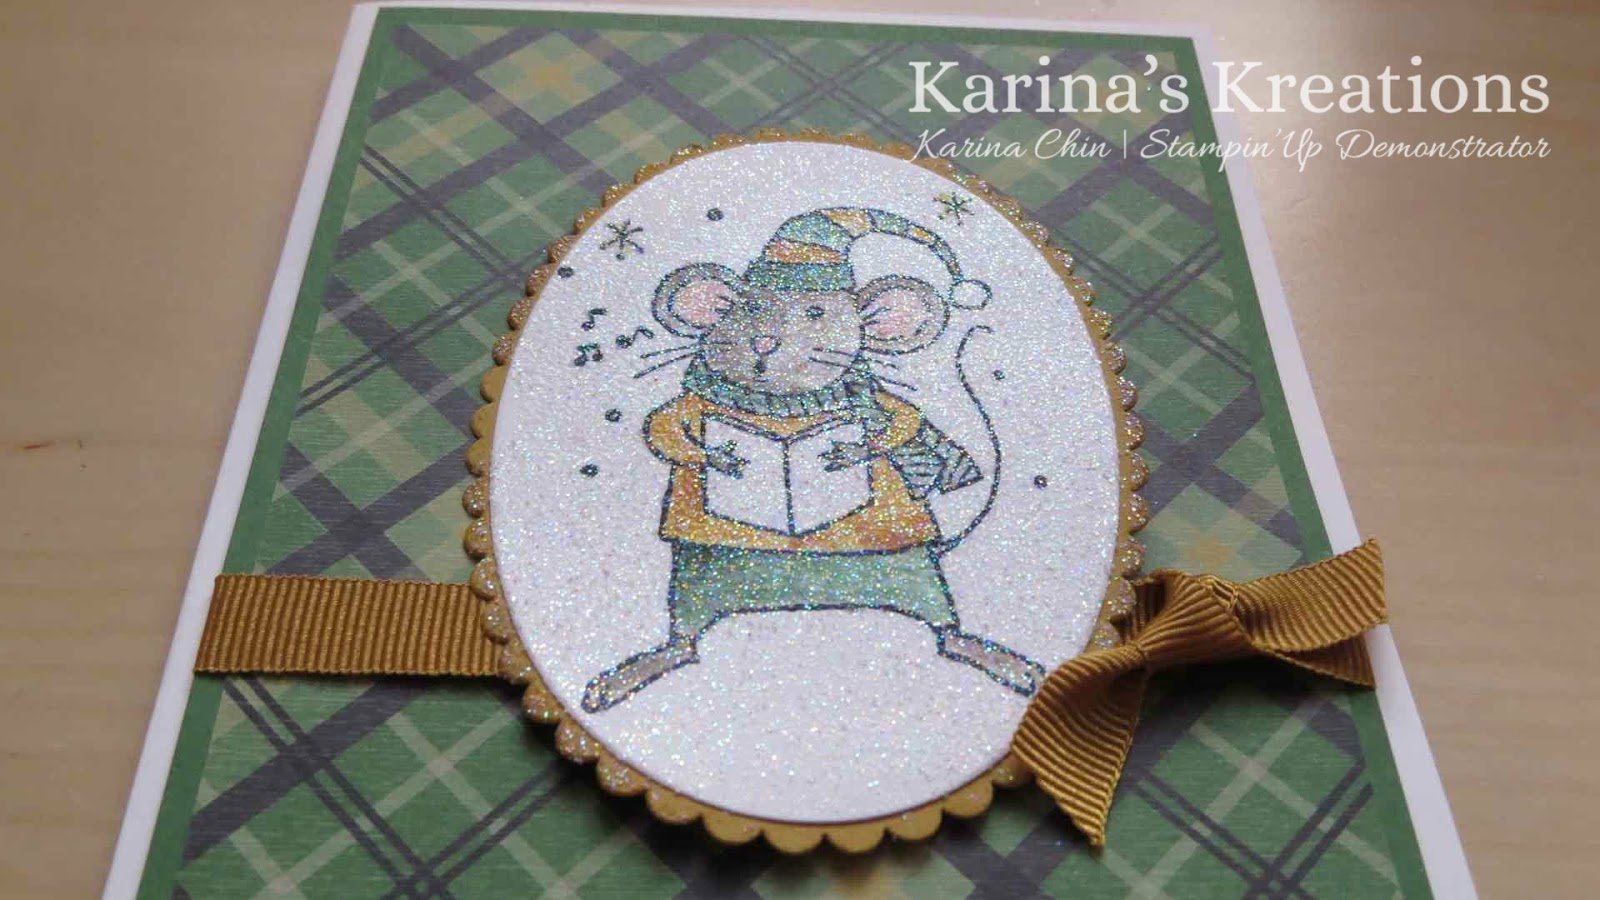
6.
Tap versamark ink all over the mouse image. Measure 1 tsp of dazzling diamonds glitter and 1 tsp of
clear embossing into a spare container and mix it up. Sprinkle this powder over
the mouse image and heat with a heat tool. The glitter will stick to your image.
Tap versamark ink all over the mouse image. Measure 1 tsp of dazzling diamonds glitter and 1 tsp of
clear embossing into a spare container and mix it up. Sprinkle this powder over
the mouse image and heat with a heat tool. The glitter will stick to your image.
7.
Attach to the card with Stampin’ Dimensionals.
Attach to the card with Stampin’ Dimensionals.
Happy Stamping,
Karina